
Hãy để tôi nhanh chóng chỉ cho bạn cách kết nối máy chủ Windows từ Ansible chạy trên Ubuntu.
Bạn phải cài đặt Python để làm theo các bước bên dưới 3.xi Ansible trên cả hai hệ thống. Bạn có thể theo dõi các bài viết dưới đây nếu cần trợ giúp.
Làm cách nào để cài đặt và định cấu hình Ansible trên Ubuntu?
Cách cài đặt Ansible trên hệ thống của bạn Windows?
Dưới đây là chi tiết của cả hai máy chủ tôi sử dụng:
- Bộ điều khiển Ansible – 192.168.0.108
- Windows Máy chủ – 192.168.0.102
Bươc 1: Tạo người dùng Ansible Windows
Tạo người dùng mới để thiết lập kết nối Ansible Windows.
- Mở Quản lý máy tính trên hệ thống của bạn Windows và đi tới Nhóm và người dùng cục bộ.
- Nhấp chuột phải vào Người dùng và tạo người dùng mới.
- Chọn hộp kiểm Mật khẩu không bao giờ hết hạn và nhấp vào Tạo.
- Bây giờ trong số các nhóm có sẵn, nhấp chuột phải vào nhóm Quản trị viên và nhấp vào thuộc tính.
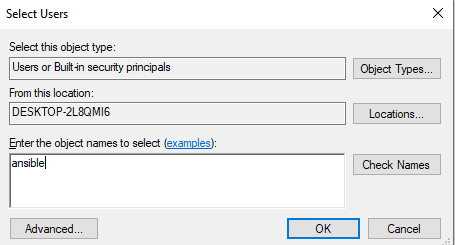
- Nhấp vào Thêm và nhập ansible vào tên đối tượng.
- Nhấp vào Kiểm tra tên, sau đó nhấp vào OK.
Bây giờ người dùng ansible trên máy đang chạy Windows anh ấy đã sẵn sàng.
Bươc 2: Định cấu hình Thư viện và WinRM
Chuyển đến bộ điều khiển ansible của bạn, cập nhật nó và cài đặt các thư viện được liệt kê bên dưới.
[email protected]:~$ sudo apt-get update
[email protected]:~$ sudo apt-get install gcc python-dev
[email protected]:~$ sudo apt install python3-pip
WinRM là viết tắt của quản lý hệ thống từ xa Windows. Nó cho phép bạn thực hiện các tác vụ quản lý trên các hệ thống từ xa Windows. Chúng tôi sẽ cài đặt python3-winrm, một ứng dụng khách Python được sử dụng để kết nối với hệ thống Windows.
[email protected]:~$ sudo apt-get install python3-winrm
Reading package lists... Done
Building dependency tree
Reading state information... Done
The following packages were automatically installed and are no longer required:
gyp libc-ares2 libhttp-parser2.8 libjs-async libjs-inherits libjs-is-typedarray libjs-node-uuid libuv1 libuv1-dev node-abbrev node-ajv
node-ansi node-ansi-color-table node-ansi-regex node-ansi-styles node-ansistyles node-aproba node-archy node-are-we-there-yet node-async

node-validate-npm-package-license node-wcwidth.js node-which node-which-module node-wide-align node-wrap-ansi node-wrappy node-y18n
node-yallist node-yargs node-yargs-parser nodejs nodejs-doc
Use 'sudo apt autoremove' to remove them.
The following additional packages will be installed:
python3-kerberos python3-ntlm-auth python3-requests-kerberos python3-requests-ntlm python3-xmltodict
The following NEW packages will be installed:
python3-kerberos python3-ntlm-auth python3-requests-kerberos python3-requests-ntlm python3-winrm python3-xmltodict
0 upgraded, 6 newly installed, 0 to remove and 231 not upgraded.
Need to get 84.8 kB of archives.
After this operation, 442 kB of additional disk space will be used.
Do you want to continue? [Y/n] Y
Get:1 http://old-releases.ubuntu.com/ubuntu cosmic/universe amd64 python3-kerberos amd64 1.1.14-1build1 [16.8 kB]
Get:2 http://old-releases.ubuntu.com/ubuntu cosmic/universe amd64 python3-ntlm-auth all 1.1.0-1 [19.6 kB]
Get:3 http://old-releases.ubuntu.com/ubuntu cosmic/universe amd64 python3-requests-kerberos all 0.11.0-2 [10.1 kB]
Get:4 http://old-releases.ubuntu.com/ubuntu cosmic/universe amd64 python3-requests-ntlm all 1.1.0-1 [6,004 B]
Get:5 http://old-releases.ubuntu.com/ubuntu cosmic/universe amd64 python3-xmltodict all 0.11.0-2 [10.6 kB]
Get:6 http://old-releases.ubuntu.com/ubuntu cosmic/universe amd64 python3-winrm all 0.3.0-2 [21.7 kB]
Fetched 84.8 kB in 1s (70.3 kB/s)
Selecting previously unselected package python3-kerberos.
(Reading database ... 244430 files and directories currently installed.)
Preparing to unpack .../0-python3-kerberos_1.1.14-1build1_amd64.deb ...
Unpacking python3-kerberos (1.1.14-1build1) ...
Selecting previously unselected package python3-ntlm-auth.
Selecting previously unselected package python3-xmltodict.
Preparing to unpack .../4-python3-xmltodict_0.11.0-2_all.deb ...
Unpacking python3-xmltodict (0.11.0-2) ...
Selecting previously unselected package python3-winrm.
Preparing to unpack .../5-python3-winrm_0.3.0-2_all.deb ...
Unpacking python3-winrm (0.3.0-2) ...
Setting up python3-kerberos (1.1.14-1build1) ...
Setting up python3-winrm (0.3.0-2) ...
Bươc 3: Cập nhật tệp khoảng không quảng cáo Ansible
Bây giờ tôi chỉnh sửa tệp máy chủ ansible với địa chỉ IP của hệ thống Windows. Vì vậy, bây giờ ansible sẽ biết hệ thống nào Windows phải kết nối.
[email protected]:~$ sudo gedit /etc/ansible/hosts

[win]
192.168.0.102
Bươc 4: Cập nhật các biến nhóm Ansible
Tạo thư mục nhập biến để kết nối với hệ thống Windows.
[email protected]:~$ mkdir /etc/ansible/group_vars
[email protected]:~$ sudo chmod -R 777 /etc/ansible/
Tạo tệp win.yaml và nhập dữ liệu người dùng đã tạo ở bước đầu tiên và một số biến bổ sung cần thiết để kết nối với hệ thống Windows.
[email protected]:~$ gedit /etc/ansible/group_vars/win.yaml
---

ansible_user: ansible

ansible_password: ansible

ansible_connection: winrm

ansible_winrm_server_cert_validation: ignore

ansible_winrm_transport: basic

ansible_winrm_port: 5985

ansible_python_interpreter: C:Usersnewsblog.plAppDataLocalProgramsPythonPython37python
Bươc 5: Cấu hình máy chủ Windows để quản lý
Mở vỏ nguồn hệ thống Windows và cập nhật nó. Bạn phải có Powershell 3.0 và .NET Framework 4.0 trên máy tính hệ thống Windows.
PS C:WINDOWSsystem32> $url = "https://raw.githubusercontent.com/jborean93/ansible-windows/master/scripts/Upgrade-PowerShell.ps1"
PS C:WINDOWSsystem32> $file = "$env:tempUpgrade-PowerShell.ps1"
PS C:WINDOWSsystem32> $username = "ansible"
PS C:WINDOWSsystem32> $password = "ansible"
PS C:WINDOWSsystem32> (New-Object -TypeName System.Net.WebClient).DownloadFile($url, $file)
PS C:WINDOWSsystem32> Set-ExecutionPolicy -ExecutionPolicy Unrestricted -Force
PS C:WINDOWSsystem32> &$file -Version 5.1 -Username $username -Password $password -Verbose
Để thiết lập WinRM trên hệ thống của bạn Windows với ansible, ansible đã cung cấp một tập lệnh cấu hình từ xa. Chạy tập lệnh trong PowerShell.
PS C:WINDOWSsystem32> $url = "https://raw.githubusercontent.com/ansible/ansible/devel/examples/scripts/ConfigureRemotingForAnsible.ps1"
PS C:WINDOWSsystem32> $file = "$env:tempConfigureRemotingForAnsible.ps1"
PS C:WINDOWSsystem32> (New-Object -TypeName System.Net.WebClient).DownloadFile($url, $file)
PS C:WINDOWSsystem32> powershell.exe -ExecutionPolicy ByPass -File $file
PS C:WINDOWSsystem32> winrm enumerate winrm/config/Listener

Listener
Address = *
Transport = HTTP
Port = 5985
Hostname
Enabled = true
URLPrefix = wsman

CertificateThumbprint
ListeningOn = 127.0.0.1, 169.254.8.240, 169.254.36.9, 169.254.102.217, 169.254.215.170, 192.168.0.102, ::1, fe80::3131:c6d7:9ef5:8f0%7, fe80::51b7:9134:550d:d7aa%22, fe80::88f1:1229:e1dd:2409%16, fe80::99cf:5796:4f8e:f5c1%15, fe80::fd77:c19d:e0f2:66d9%9

Listener
Address = *
Transport = HTTPS
Port = 5986
Hostname = DESKTOP-2L8QMI6
Enabled = true
URLPrefix = wsman

CertificateThumbprint = C83B3FC8B274D0B650F0FD647DC7AC129BBE3FA0
ListeningOn = 127.0.0.1, 169.254.8.240, 169.254.36.9, 169.254.102.217, 169.254.215.170, 192.168.0.102, ::1, fe80::3131:c6d7:9ef5:8f0%7, fe80::51b7:9134:550d:d7aa%22, fe80::88f1:1229:e1dd:2409%16, fe80::99cf:5796:4f8e:f5c1%15, fe80::fd77:c19d:e0f2:66d9%9
Đặt winrm để cho phép lưu lượng HTTP.
PS C:WINDOWSsystem32> winrm set winrm/config/service '@{AllowUnencrypted="true"}'
Service
RootSDDL = O:NSG:BAD:P(A;;GA;;;BA)(A;;GR;;;IU)S:P(AU;FA;GA;;;WD)(AU;SA;GXGW;;;WD)

MaxConcurrentOperations = 4294967295

MaxConcurrentOperationsPerUser = 1500

EnumerationTimeoutms = 240000
MaxConnections = 300

MaxPacketRetrievalTimeSeconds = 120
AllowUnencrypted = true
Auth
Basic = true
Kerberos = true
Negotiate = true
Certificate = false
CredSSP = false

CbtHardeningLevel = Relaxed
DefaultPorts
HTTP = 5985
HTTPS = 5986
IPv4Filter = *
IPv6Filter = *

EnableCompatibilityHttpListener = false

EnableCompatibilityHttpsListener = false

CertificateThumbprint
AllowRemoteAccess = true
Đặt xác thực thành cơ bản trong wirm.
PS C:WINDOWSsystem32> winrm set winrm/config/service/auth '@{Basic="true"}'
Auth
Basic = true
Kerberos = true
Negotiate = true
Certificate = false
CredSSP = false
CbtHardeningLevel = Relaxed
Bươc 6: Kiểm tra kết nối với máy chủ Windows
Bây giờ tất cả các bước trên máy đã được thực hiện. Chuyển đến máy điều khiển ansible và ping máy chủ với hệ thống Windows sử dụng mô-đun win_ping ansible.
[email protected]:~$ ansible win -m win_ping
192.168.0.102 | SUCCESS => {

"changed": false,
"ping": "pong"
}
Thông báo thành công cho biết kết nối đã được thiết lập. Bây giờ hệ thống Windows nó đã sẵn sàng để quản trị từ xa từ hệ thống Ansible chạy trên Ubuntu.
